Hey! What’s goin’ on!
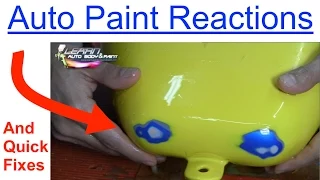
So, even I come across painting problems once in a while. I was laying base coat on this tank and overdid it on an area, it came out too thick and I ended up getting some Paint Biting reactions.
Paint Biting is caused by some chemical reaction with some paint behind it. That’s what I’ll teach you on this week’s video, how to fix automotive paint reactions or paint biting.
What happened was, I laid 2K primer on the whole Harley Davidson gas tank project but on one area, I cut through to the blue paint that was originally on the tank. So we had a little bit of sanded blue paint and then 2K primer.
When I first laid the base coat, it was fine. I laid some thin coats. But I laid the last coat a little too thick and that caused the paint biting. I let it dry for a good hour because of its thickness.
In order to fix it, I wet-sanded the area down with some 400-grit until smooth. You don’t have to lay primer on it again. Well, the right thing to do is to lay 2K primer but I want to teach you how to remedy the problem just by dusting the base coat on little by little to cover it.
This problem presented itself to be the perfect opportunity to show you what paint biting looks like and how to quickly fix it. I know that this is a common painting problem for a lot of guys out there. But other than that small area, the whole tank came out excellent. There were no problems anywhere else on it.
Make sure you watch the video as I show you how I wet-sand the area with a 400-grit sandpaper. You don’t have to be afraid because base coat can be sanded right after it’s dry.
If you take a careful look at the video on that part, you can see that it revealed quite a few layers – Yellow base coat, 2K primer, original Blue base coat, silver metallic, another primer…it even looked like there was something else under the last layer.
That’s exactly why we had the paint biting problem. When you lay your paint on too thick, your thinners and your reducer, your paint starts to eat up and you get a chemical reaction.
So that’s what happens. But of course, there’s a way around it.
It’s important that when you’re laying on your base coat, you have to be careful not to spray it on too heavy.
That’s the cool thing about the VIP Course because I also show you tons of situations like this that you’ll possibly come across some time and I teach you how to fix them! Not only that, but more importantly, how to avoid them. But it’s unavoidable…this is what happens sometimes when you’re working on a project, you know — sometimes you’re rushing a little and you just want to get it done, then you come across a problem like this.
A lot of people may freak out but I tell you, there’s always a way around it, a trick, a hack. 😀
So when you’re wet-sanding it, make sure it’s really feathered out meaning it’s really smooth and you don’t feel anything rough on it anymore. You’ll see how I do it in a circular motion. No need to push too hard, just use your hand pressure. After it’s all smooth, just wipe the area dry.
You might be thinking that we could just prime it, with a canned primer. But if you do that, you might end up with more problems and I didn’t want that.
I had a little bit of base coat left in my spray gun so I went ahead and fixed it right away. We sprayed it on the spots very lightly.
Unfortunately, I lost the footage where I was spraying the base coat. I really thought the video was recording while I was dusting the area but when I checked on my computer, I just found out that it wasn’t. Agh!
I really apologize for it.
But don’t worry because if you ever end up joining VIP, I have tons of examples inside showing you how to fix certain situations including this, paint biting and auto paint chemical reactions.
Still, make sure you watch the full video above because I show you what I did as far as laying on clear coat and the finished product up close.
It came out looking great! You won’t see any hint of the previous problems on the same area anymore. All I did was held the spray gun really close to the spot and then dusted it with the base coat. Little dusting, a lot of air, let it try bit by bit and see how it gets covered up little by little — that’s the trick!
What you don’t want to do is, just lay the paint on because it will end up with a chemical reaction again. So what you have to do is, just dust it little by little, then let dry, dust it again, let it dry…do it repeatedly.
When you got the whole area done then just coat it a little bit and then lay your clear coat.
Check out the finished product, it looks awesome! I used some pearls mixed to the clear and see how it shines under the light. The cool thing about pearls and flakes is, you can take an ordinary color and do some pretty amazing things with it. For this tank, I used Gold pearl on a Yellow and it turned it to be such a beautiful color! I also added a touch of some Silver micro sequins flake in it.
I didn’t even buff the paint job yet. I don’t think I’m going to have to. What I think I’ll do instead is, sand the thing down with 1200 or maybe 1500-grit and then put our Harley Davidson decal on. Then finish with two more coats of clear on it. That should do it.
I show you the spots where we had the biting on and you really can’t tell it used to be there.
That’s basically how we got around it. We started with the chemical reactions on both sides in an area of the tank, we sanded it wet with 400-grit – make it smooth, then dust on the Yellow base coat instead of re-applying the primer and going through all the hassle. Top it off with our clear coat mixed with some Gold pearls and Silver micro sequin flakes.
Voila! We have ourselves some very nice-looking tank.
I was also going to use an Orange, like a Red and Yellow, kind of like a pumpkin color on it but I’m glad I went with the Yellow because it ended up looking like a really nice Canary Yellow, especially with the Gold pearl…I love how it turned out!
Like I said, if you want to learn more about this, check out the LearnAutoBodyAndPaint VIP Course!
We’re also giving away a FREE 85-Page Auto Body And Paint Manual and a FREE 90-Minute Auto Body And Paint DVD. It shows the quickstart stuff that you need to know if you’re a total newbie getting into this. You can definitely do this!
It’s really amazing to see your finished projects, knowing that you painted and completed it yourself. It’s so rewarding looking at them out in the sun and just marvel at your own work of art.
At the end of the video, I quickly show you a little pocket bike that we recently completed as well. Its painted with an Inferno Red base coat and finished with the same clear coat that we did on the Harley tank project. You will see how the red turned out looking like a Burnt Orange because of the Gold pearl on the clear coat. Really nice-looking, beautiful color.
This was, by the way, just a quick paint job. We didn’t go crazy on the bodywork or anything like that. After all, it’s a pocket bike and it’s going to be flying 50 miles an hour on the ground, getting rock chips all over the place and get beaten up. I just wanted to put something cool on it. We went ahead and put the decals on, laid clear coat over it. So all the decals on it are within the clear. The 46 decal was laid right on top but the white and grey ones are all within the clear coat. It came out looking pretty cool, too.
I can’t wait for you to be able to do it all on your own and bang out your own cool projects just like these. I think you’re really gonna have a fun time!
Don’t forget to Like the video, Share it with your friends, leave your comments below! Let me know how you like these projects. It always thrills me to hear from you, guys!
I’ll see you again next time.
-Tony
Other Helpful Links:
Get A Free 90 Minute Auto Body DVD Here
How To Auto Body And Paint Q&A – Part 1
DIY Auto Body Work And Painting Q&A – Part 2
How To Paint Cars – Q&A Part 3
How To Pinstripe A Motorcycle Tank
How To Paint A Motorcycle Yourself
Preview Finished BMW Body Kit Video
Warwick Spray Gun Review (what we use to paint at LABAP)
Great tips! I’m painting a vehicle for the first time. Primer came out ok. I put three coats and wet sanded all layers. Did three base coats pretty much the same way. Came back from dinner to find two spots that cracked and bubbled up (looked like an alien was coming out of it). Sanded the base coats along with some of the primer. Started putting the base coats on again. Thin layers each time. This morning had a few cracks. Not sure why. I wet sanded and applied another thin coat. Hopefully thays right.