Hey it’s Tony here… Thanks for watching this video and checking out the blog today. In this video, I will talk about how to paint a scooter, moped, bike or bicycles.
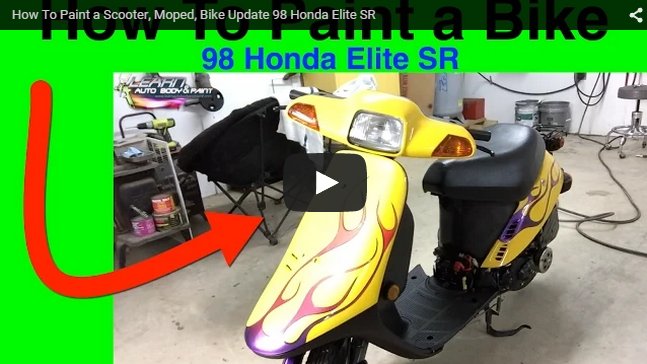
A lot of people are asking about the moped project and the Advantage Clear that I’m talking about. So, this is an update on the on the ’98 Honda Elite SR project that I’m working on.
Before the moped project, let me give you an update on the Miata that I’m also doing, which I talked about in my previous videos.
The complete Miata project will be in the LearnAutoBodyAndPaint VIP course. It’s looking good. I had to redo an area of the lip spoiler because the first flow of the epoxy was not completely mixed.
You should waste about a tablespoon of epoxy before you use it. This is an important tip so you don’t mess up like I did.
I also had to redo the tab of the scooter. It was broken and I thought it was missing. But, it was actually on the scooter. I put some epoxy on it so I can put the panel on tomorrow.
I just painted the moped this morning. I didn’t want to clear at night because of the bugs. It took me about an hour.
With the panel, I did a yellow with a little bit of gold pearl and silver flake. I even put my name on the side which came out really nice.
The Advantage Clear Coat is pretty good. It has a nice gloss to it. We’ll see in a week how it looks. But, if it needs a little buff, then we could water sand it lightly with a 2000-grit sandpaper and buff it out.
I did purple paint at the front bottom so the caps are purple too. And, plasti-dipped all the rims of the bike with flat black. I also painted some parts with SEM Bumper Paint.
The muffler piece is purple. I left the bottom pieces purple and signed it with my name. It looks pretty cool.
The paint and the flames look mean under the sun. It has a red pearl in it. The whole idea was to have the flame go toward the left side of the bike.
The left side is flamed out. There are no flames on the right side. It’s just my signature on it.
On the front, the flame starts with purple at the bottom, then turns into red, then orange at the topmost part of the flame.
On the side, I did a purple flame that turned red toward the back. I wasn’t able to use orange on this flame because I used up all my purple color to fade into red.
I was thinking of doing flames on the top but decided to just leave it yellow. It’s an eye-catcher.
This is all pinstripe. I did a pinstripe over the flames because I messed it up.
When I was taking the fine line tape off, I used the cheap primer under it. Instead of using the 2K primer, I used the rattle can primer.
Some of the yellow base coat started coming off when I took the fine line tape. So, the only way to hide it is to pinstripe it.
I pinstriped everything in my living room last night while watching TV. This morning, I just put clear on it and it came out really nice.
Everything will be in the VIP course including the screw ups on my projects and how I fixed it.
It feels cool. But, if you want to get rid of this feel, you can water sand it with 1500-grit sandpaper and put two more coats of clear on it.
But, I don’t have to do that. It feels cool and it looks cool. That’s all I’m looking for.
It only took me a couple of hours to work on this. I banged it and put it all together. I think it looks hot.
I was driving it around the neighborhood today with a half panel while I’m waiting for the other pieces to dry. A lot of my neighbors are giving me a thumbs up. There’s a kid that was screaming out the window of his car, “nice bike!”
I’ll give you a full video once it’s completely done.
So, if you want to do all of these cool stuff on your mopeds, motorcycles or cars, check out LearnAutoBodyAndPaint and download the FREE 85-Page Auto Body Manual.
Once you download it, you get signed up for my newsletter where I give you tons of great information that will help you with your auto body and paint jobs.
Join LearnAutoBodyAndPaint VIP course to see complete, step-by-step guide on some of the projects that I did.
We have thousands of VIPs all over the world who are using all of what they have learned in the course on their projects. Our members get to interact with each other too. They share their thoughts and stories.
It’s Tony from LearnAutoBodyAndPaint. Please Like, Share and Comment on the video.
I will talk to you soon. Bye!
-Tony
Other Helpful Links:
Automotive Paint Cost – Medium or High End Clear Coat?
Breathe-Cool Setup – Fresh Air Mask For Automotive Painting
9 Easy Steps To Blend Paint Jobs From Home!
How To Paint Your Car Interior – Car Interior Painting Tips!
Can You Add Pearl In Base Coat? – Automotive Bodywork And Paint Tips