Hey! What’s goin’ on?!
In this quick video, I’ll show you how to pinstripe your car with vinyl striping. I was doing the design on the sides of a 2015 Isuzu Highlander, just to give it some pizzazz. I use ProStripe. It’s really easy to do. You don’t have to have a lot of skills like those painting pinstriping that other guys do.
So what you do is, first see how much you need. Then, you can figure out how you want it to look. Like in the pinstripe I used, you can choose to have it thick stripe on top or thin stripe on top. I chose the thick stripe on top.
Before you start putting the pinstripe, make sure your body panel is clean – wash the car, the area and dry with a shammy. Make sure there’s no dust on it.
Once you get started, you go over the body line. I do it one panel at a time. Make sure to press on the end of every panel, that way if you have to peel the beginning end to redo it because it’s not straight enough or whatever, at least it doesn’t peel off the whole thing.
After you’re done with the first area, just keep on doing it on the next areas. Make sure you watch the video so you can see how I do it. I’m holding the pinstripe in a certain way so that as I peel, I’m peeling the back off the pinstripe. That’s what you’d want to do.
Try to get it as perfect as you can. Of course, you can always peel it off and redo. You also don’t want to pull too tight because you’ll stretch it and it will make it thinner. You don’t want any spots where the pinstripe is thinner than the rest.
When you’re pushing or sealing the pinstripe, just do it lightly at first. If you do it abruptly and too hard, it might cause an overlap and you don’t want that.
I had to redo the front section because it wasn’t looking too straight. No big deal. Yes, it can get a little tricky. So I just really followed the body line as you can see in the video. I started at the back panel which is narrower and it got wider towards the front part.
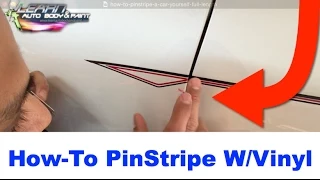
I also did some designs on the front and back ends of the pinstripe. I saw the design of the back window where the moldings formed kind like of a triangle shape so I thought of copying that, then did the same on the side I was working on in the video.
I just use my fingers, hands to measure the distances and sizes.
After that, I peeedl off the plastic covering that’s on the pinstripe. While doing that, I make sure that the sticker was pressed well. Took about an inch from the end of the sticker and formed the exact design I had on the finished side, using a sharp razor blade. Don’t push too hard when you’re doing this, instead just do it very lightly and cut the extra pinstripe to achieve your desired design. You don’t want to scratch your paint.
You can use the same razorblade to cut the pinstripe connecting the door panels. Just press the ends to secure it in place. It was the same for the front end, just came up with a different design just to make it look more interesting.
The challenging part is working on two opposite sides and having to go back and forth copying what you’ve done on the finished side and making sure it looks the same. I am obsessed about making it look identical while just eyeball-measuring the lines.
I used 2-tone pinstriping on the front end. I added some red inside the black one, just using the skinny/thin line of the red pinstripe to put in between the black thick and thin lines in order to add more color and design to it. We just removed the thicker line since we don’t need it.
Just use the same razorblade to cut the extra pinstripe lines on the designs like I did on both ends.
I hope you like the quick little tutorial on putting pinstripe on the side of the car. It came out looking really cool! It gave the car a nice custom look for about 15 minutes of work. It just gives it a different kind of look.
It’s all up to you whatever design you want to do on the front. I just thought of doing mine like I did because the body line is gone when you get to the fender, that’s why I decided to do a design that ended about five inches into the fender area.
If you’re into body and paint and you want to learn further how to customize your cars, put body kits, do body work, restore your classic – check out our VIP Course right now! I’m giving away a FREE 85-Page Auto Body And Paint Manual where you can basically download it. That’s 85 pages of tips and tricks about auto body and what you could do to restore your car.
Please like and share this video and post your comments, too! I love hearing from you!
Talk soon!
Tony
Other Helpful Links:
How To Auto Body And Paint Q&A – Part 1
DIY Auto Body Work And Painting Q&A – Part 2
How To Paint Cars – Q&A Part 3
How To Pinstripe A Motorcycle Tank
How To Paint A Motorcycle Yourself
Preview Finished BMW Body Kit Video
Warwick Spray Gun Review (what we use to paint at LABAP)
This was great man.
The video was very informative but was curious as to how you choose the size or width and gap of the tape. Keep up the excellent work!
Very informative content and a video on how to pinstripe your car with vinyl striping. If you are looking for professional services to apply pinstriping tape on your vehicle visit or contact Custom Auto Trim company.