Color sanding and buffing may just be the most important skill that you learn aside from painting to achieve maximum gloss and pro finishes.
In this post we will cover the best sand paper grits to use when getting your paint job ready for the buffing stage.
When starting to color sand your freshly painted panel you want to be sure to use a fine sand paper. Not 400, 600 or even 800 grit!
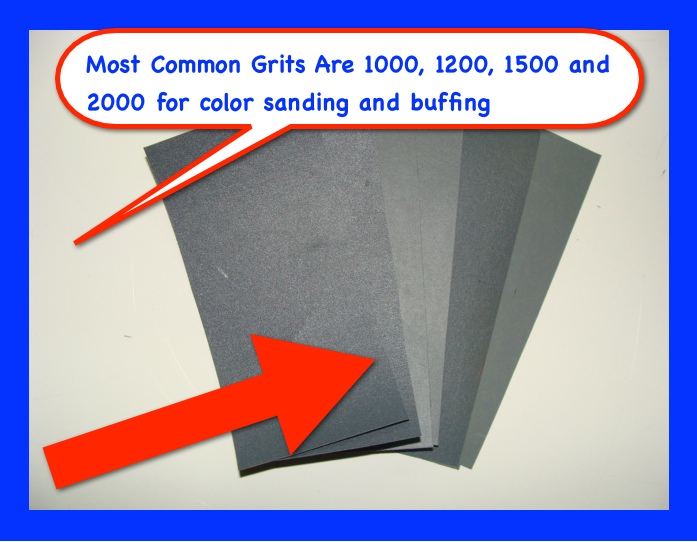
The Most Common Sand Paper Grits for Color Sanding
The most common sand paper grits for this part of the body work process is 1000 grit, 1200 grit, 1500 grit and you have your 2000 grit papers.
I personally don’t use 1000 that much.
If I have sags and runs I’ll start with 1200 but not for long. As soon as I start to see that I’m getting a flat surface I’ll move to 1500, then on to 2000 to get it nice and smooth and ready for my compound.
 When sanding you basically have a few techniques. You can wet sand or you can dry sand.
If you’re a beginner (even advanced in some cases) wet sanding is preferred.
Mostly because it saves on paper and you can cut slower and nice and easy.
You will also always have more control when sanding by hand.
When I dry sand I like to use the DA (dual action sander).
This is only recommended for experienced auto body guys because when sanding a panel like this you can cut down though the clear coat very quickly and make a mistake if you’re not paying attention.
So why use the DA? Read more below the video to find out.
Also please watch the video below as I cover a few other important tips that I may have missed here. Besides, video is cooler 🙂
Speed Up The Sanding Process by Dry Sanding With a DA
The cool thing about dry sanding when using a DA is that you can really fast track your sanding stage.
You can sand an entire car within a few hours compared to taking 1-2 days wet sanding by hand.
And I’ve dont it MANY times.
I remember in my younger days, I was a brute. I would completely sand an entire classic car down by hand in 6-8 hours and by night be ready to start buffing for a few hours.
15-17 hour days at the shop was not uncommon.
When dry sanding you’ll end up using more sand paper because dry paper will cake up and go bad much faster than wet sand paper; but if your looking for speed, this is the way to go.
How Many Sanding Discs Will You Use?
From my experience, you’ll use about 3-5 sanding discs to sand a hood of a car down flat. 2-4 for a trunk, and 2-3 per door and quarter panel. Of course this depends on the size of the car, but you get the idea.
In total you’ll probably use up 20-30 discs to completely sand out a mid size car or truck.
Each disc can range anywhere from .60 – $1. depending on how many you purchase. A small pack or a box of sand paper.
After cutting with the DA, I like to finish up with washing the panels down with 2000 grit wet sand by hand.
Like I always say, you should always finish any kind of bodywork by hand. When learning how to color sand, take your time. Sand out all of the paint imperfections such as dust or orange peel.
This is how you’ll always get the BEST results. Finish it by hand like you’re caressing your girlfriend down with a bottle of lavender lotion.
Then after buffing with the machine with your 2 step process, wool pad with compound, then foam pad with glaze. Now you’re ready for hand waxing.
Side Note: if you want to see all of these steps in step-by-step detailed video, then be sure to check out our VIP membership club and how we will be extremely excited and delighted to help you get the results that you’re looking for with any type of body work and painting project that you’re working on.
Nothing is too big or too small. Learn exactly how to paint your car yourself. The feeling is AMAZING when you look back at your project and say “I did that!”
I hope that you’ve learnt a lot from this post and if you liked it then I think you’ll love what we have in store for you within VIP so be sure to check it out when you have a chance.
Please like, share and comment below as I would love to hear your thoughts 🙂
Talk soon!
Experience Unmatched Precision and Control with The Atom-X Spray Guns with FREE GUNBUDD for any spray gun purchase!🎉😎


cool
When I do my cutting and buffing, if there are runs ill start by taking a razor blade and carefully dragging it over the run to knock it down. I’ll then grab 1000-1500 sand paper and wet sand it with a block, wipe, then decide if I should go further. After the run is knocked down ill grab a 2000 grit hook-it ( different style of sand paper, has a little cushion to it) pad for my DA and wet sand it, kinda float over the paint job, cut down the orange peel a little bit. Ill then move to 3000 grit hook-it, and do a nice finishing wet sand first with a DA then by hand. After that ill move to a #1 buffing compound with a wool pad, float over and look for any scratches. After that ill move to a #2 rubbing compound with a foam pad, making sure I remove all my wool pad swirls. And every now and again ill finish it by hand rubbing a professional detailer “Wizards Mist-N-Shine” evenly rubbing it in.
Yeah, the razor tactic is awesome. I also go over that in great detail within the VIP course. Sounds like you’re on the right track with your color sanding and buffing! Great job 🙂
Everything I’ve seen you do looks great. I’m fixing to make an attempt at painting my first truck – an old 1988 GMC Suburban; a BIG long box. When I look down the truck I can see little dimples in the doors and various other places – looking straight at the door you don’t notice it, but, rub your hand on it and you can feel it. Should this be filled with something first or prime it in those areas several times and hope you can build it up that way?
Sounds great Paul. It should be filled with body filler. Sand all of those areas with 80 grit and fill. If they are bigger and deeper dents then you may need to grind down to metal, then fill. We actually have full-length videos that take you through the whole process within our VIP training area.
Best part – You get full support anytime you need it from a community of like minded members. Check it out when you get a chance. Be cool and good luck with your projects!
If you have any more questions feel free to leave them here on the blog. I’ll try my best to answer and maybe even make a video for it.
Learn more about VIP here.
I am trying to paint an old motorcycle tank. It is an old lacquer paint with micro silver flakes.I have taken it down to bare metal sprayed with etching primer 1k rattle can. went over that 2k shopline is this aproblem? want to go back as close to original as possible. will this be a problem
No, you will be fine with that setup. Good luck!
TONY,
IF YOU DON’T USE A CLEAR COAT AND ONLY USE A BASE COAT (SINGLE STAGE) DO YOU COLOR SAND A BASE COAT OR JUST BUFF IT?
IF YOU DO COLOR SAND WITH WHAT GRITS?
hey Bob! Base coat single stage isn’t called (base coat) single stage is called enamel. I am not correcting you to be cocky, I am helping you understand the difference. You can color sand it with 2000 and buff it.
Just be careful when doing this to metallic single stage paints. It has not happened to me, but they say buffing metallics and cloud your metallic paint job and make it look blotchy. I’ve buffed a few metallic single stage jobs and have never ran into this problem.
Hello Tony! This is Eric of Richmond, VA
Being my first time trying to paint my Nissan 240sx. Here is the situation. It’s flaking all over the body and I believe the paint has faded in addition quite a few dimples on passenger door panel and on slight dimple gash on back quarter panel. What are the proper steps for preparation for paint job? Any advice is appreciated. Thanks!
hey Eric! You know, I had a video on my Channel, tried to look for 10 min but couldn’t find it. Well, you need to sand it all down with a 320 grit paper. A DA will be your best bet as you can save some time there.
I would then mix up some good 2k primer and spray all of the sanded areas (be sure to feather all paint edges..) Prime, wait till it dries, then wet sand with a 400 grit paper. Then your good to paint 🙂 Don’t forget to wash clean with wax and grease remover, tack it down and shoot it. Good luck!
Tony!
P.S. did you see what we offer you within the VIP community? Go here to learn more about becoming a VIP.
I want to paint my outboard motor in metallic silver acrylic paint I only have a 2 hp compressor do I need a Lvlp spray gun and what size tips do I need for metallic , primer and clear coat .will I need to etich prime the aluminium first
Thanks trevor
Trevor again. This is just 1 part of the motor and a fiberglass cowling lid. So it’s only small job but I have to rub out a few scratches on the leg and cowling. I hope you can give me some advise.
Regards Trevor
I would lust sand and buff it out after you clear coat it. Check out my blog for more information. If you want to learn more about auto body and paint and plan on paining more projects then check out our vip club here: https://vip-offer.learnautobodyandpaint.com I hope this helps!
P.S. Use a 1200, then a 2,000 grit sand paper and wet sand your clear. Then you can buff with a rubbing compound by first using a wool pad, then to a foam pad. I like to use 3M products. Good luck Trevor!
Yes I would prime the cover first. You would need a 1.4 tip and yes a LVLP would work well! We will actually be selling awesome quality and performance spray guns here within a week. You may want to hold off for a great value.
I read your reply but I still don’t know if I need a Lvlp spray gun and what size tips to use for matalic silver acrylic paint . I have a 2hp compressor with a 50 litre tank ,can I use a hvlp gun or invest in a Lvlp gun and do I need to etich paint the bare aluminium before I paint I have a hvlp gun with a 1.4 1.7 and a 2.0 tips I have rubbed down to bare aluminium,where all the scratches where or can I just prime the bare patches with primer . I am not sure what to do because I want to do it right thanks again for you time and expertise
Regards Trevor can you tell me how much for a Lvlp gun and delivery to australia
Thanks tony I will wait before I start.two buy a Lvlp spray gun what size tips does it come with,thanks again I am enjoying all your video and have learnt so much in a short amount of time can you let me know of prices and delivery to Australia and what I need to do about priming or etich priming the bare aluminium .thanks again.
Regards Trevor
I painted a car with metal with flake after clearing it u can feel the flake what should I do
Sand it out, then lay 2-3 more coats of clear coat. We cover all of this on video within the VIP course. Good luck my man.
I am restoring a 32 olds sedan, no body work needed, it has been repainted, but its rough.
I have removed everything engine, fenders, doors etc. Debating wether to get it media blasted or use da sander another question is there anywhere I can find the original color of paint, its black now, changing color. Looked at your videos, I will be ordering your couse in the next week, since I have no experience at painting.
hey Bill!
It all depends about the media blasting and sanding. If you have the setup, go with media. If not, sand it. I would take a look at Hemmings or call your local autobody paint supplier and ask if they can make you that color. They usually can. I would spray that thing base coat clear coat. It’s the most durable and workable paint today. Plus you can buff it to a ULTRA-HIGH gloss. We just became an Authorized Warwick Spray gun dealer and now sell them on our site. If you’re in the market for a NICE and affordable spray gun then check them out here: https://www.learnautobodyandpaint.com/store I also have some new videos coming out doing some painting with them. One is being uploaded as I type this. Get back to me. Talk soon Bill!
Tony
are the adapters available for the 3-M cups for the Warwicks?
Aloe’ha
Yes they are. We mention what fitting is needed in the store under each spray gun’s details. Check out the store here
how long can you wait after a paint jobs done to sand out orange peel? I had a guy paint a car for me and it has some orange peel and it looks shitty. CanIi wet sand it and buff it out? its been about 4 weeks.
Thanks vettedrjoe
Yes. Most times you can sand and buff it after a few short days. Some clears can be buffed hours, or the next day. Good luck.