
Don’t worry about the oil stain on my shirt. I was under a car and I had oil drip on me.
In this quick video, I want to talk to you about how to block sand primer flat.
It may sound weird but I use it in a lot of my training videos in the VIP course. I always talk about something called “sanding flat”, “flat-sanding” or “block-sanding”.
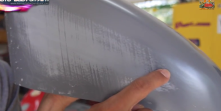 When you look at the gas tank at first, you can see a bunch of lines going up and down. Some of them were a little deeper than others. Basically what I did was, I sanded the whole gas tank down with a 150-grit sandpaper to get all the imperfections out like some of the surface rust. We actually put about 4 heavy coats of 2K primer on it.
Flat-sanding is sanding it flat using a block and maybe a 400-grit sandpaper after the primer is applied. As you sand, you will start to see flat areas.
Once the whole gas tank starts to look like a flat area, that’s what we’re looking for. So when I paint it, I will have a nice finish.
If you don’t do flat-sanding, you will have big problems. The paint job won’t come out nice.
In the video, I demonstrate a quick flat-sanding on the gas tank. Just remember what it looked like before I did that. I go over it a couple more times, water sanding in order to show you what your body work is supposed to look like before paint.
Always remember that you should always go with the body line. As you go to the top, do it on an angle. It’s supposed to be that dull grey look by the time you’re done.
This is one of the most important parts of prep. If your prep comes out great, your paint job is going to come out great.
Some gouges can be deeper. If they are and you’re starting to hit metal, that means you just have to give it another coat or two of primer to fill those scratches in. But most times, if you do a good job the first time and you fill it a lot, you don’t have to go back and do it again.
After flat-sanding, wipe it dry to inspect how you did. If you guys have kids, old baby clothes work perfectly for wiping stuff dry. 🙂
When you see everything flat, that’s how you want it. In areas where it doesn’t look flat or if you see little pinholes, just keep sanding.
For small dents, you can just scuff it and put some glaze putty on it, block-sand it out then put primer right over it.
If you’re working on a dent on a quarter panel, a fender or any kind of body work…you should block-sand it down. If it needs more filling, you can fill it. If you only have a few spots to fill, you could try sanding it more with a 400-grit sandpaper. However, if it needs more, you can get some glaze putty, fill it and then block-sand it out.
When you’re done, you can fold the sandpaper in half for the corner areas. I like to use the palm of my hand when I do the round areas. You could really get a feel for the body of what you’re working on.
Once it’s all flat, you’re ready for your paint.
I hope you learned a lot about sanding flat or block-sanding your primer to get all the imperfections and scratches out.
Get a FREE 90-minute Auto Body DVD Here, Just help me out with the shipping cost.
If you want to get more in-depth about this kind of stuff, check out our Training Course and VIP community.
Leave your comments below if you have questions and thoughts you would like to share with us. I’d love to hear from you guys.
Have a great day!
– Tony
Other Helpful Links:
Limited Offer: Free 90 Min Auto Body DVD
How To Plan Your Auto Painting Project
Warwick Spray Gun Review (what we use to paint at LABAP)
Hey tony all ur info is great should I be wetsanding flat between primer coats?
Yes of course! That’s how you want it before paint!
So in between every primer.coat I should b wetsanding it flat
Hey Tony like the channel your videos have help me out greatly. I am working on a kids pedal car for my 11 month son, thats probably about 3-1/2 ‘ by 1-1/2 and it has similar lines in it where it was pressed by the manufacturer and it also had some small dents. Its pretty old. Has alot of curves kinda hard to get the sanding perfect. Anyways So far I have stripped it of its original paint down to bare metal. I then applied one rattle can of automotive primer (gray) rustolem then went and applied some bondo (overkill) which I should of bought glazing putty, sanded that down with 80g then 220G. Sa. Pa. to level the gaps and lines which didnt do so well. I then applied one rattle can of rustolem filler primer (gray) that seemed to give me better coverage, I then wet sanded that with 220&320 but there were high spots so I hit it with rustolem flat black primer so the next time I sand it I’ll be able to see how far I sand. My question to you is what grit of sand paper should I use to get the body ready for paint. I really want this project to have a great looking paint job. Any advice would be much appreciate. Thanks for your time. Keep the videos coming thanks Tony. ——-Collin
400 grit is ready for paint, I would also prefer wet sanding. Learn more in VIP here: https://vip.learnautobodyandpaint.com/exclusivevip Good luck Collin!