
Rust can make an instant impression. But the biggest fear that many car owners have when they see rust on their vehicle is just how much will it cost? We’ve all been through it. Your vehicle has been sitting, unused for a few days – weeks even! Before you go anywhere near it again, you have to get all of that orange peel, rust, and dry, chalky paint off of your car’s body. Read this post or watch the full video which covers more about what to do in this kind of autobody and paint problems. Get Free Auto Body Training Guides and Videos here and don’t forget to LIKE and SUBSCRIBE to my YT channel. Stay tuned for new videos coming out.
What grit sandpaper do I use to cut the orange peel down initially? And what is the best way to remove the rust?
So what you can get in this area, your rain, your drip rail here, I would grind all that out with a grinder. Grind it all out, take it all out and just get a new seam seal. They might have a product called Drip Rail, look into it.
There’s a filler that you can put back in here to give it that protection from rust. But for now, I would grind it, prep it, and paint it. You could always put the bead seam sealer over it when you’re done, it comes in different colors, but you can also paint it as well. So double-check that but as far as the rest of the top here, I would go down. You could probably use 100 or maybe even 80 grit. 80 To 100 grit, sand it all down to the bare metal.

Then you can get white vinegar, mixed with water 50:50, put it on a rag, and just wipe it down wet with vinegar. The vinegar will kill the rust let that dry and once that’s dried, get 80 grit again or you could even be down to 100-150 grit. It doesn’t matter whatever grit you feel. Get it sand after the vinegar-water dries, you could resend with 100 150 grit, blow it off, tack it and I would spray some epoxy primer on it. Mix up a quart or whatever you’re working with, spray 2-3 heavy coats of epoxy on it, let that flash, then you can spray 2-3 coats of 2k filler primer on top of it and block it out.
If you see any imperfections after that point, you’re going to have a lot of material on it. So if you see any imperfections after you block it, you get it down, after the 2k you can start with like a 240 to 320 give or take to kind of cut off some of the primer, orange peel, or just to get down so basically get to where you filled all your little pits. If it looks good, keep going and finish it with 400 then you could put paint on it. If you have pits that you still have to fill, then that’s when you would fill the pits with a glazed putty. You could use a 1k or 2k, I would probably use 2K glaze putty. You would glaze putty it, block it, primer it again and then you’re ready for paint.
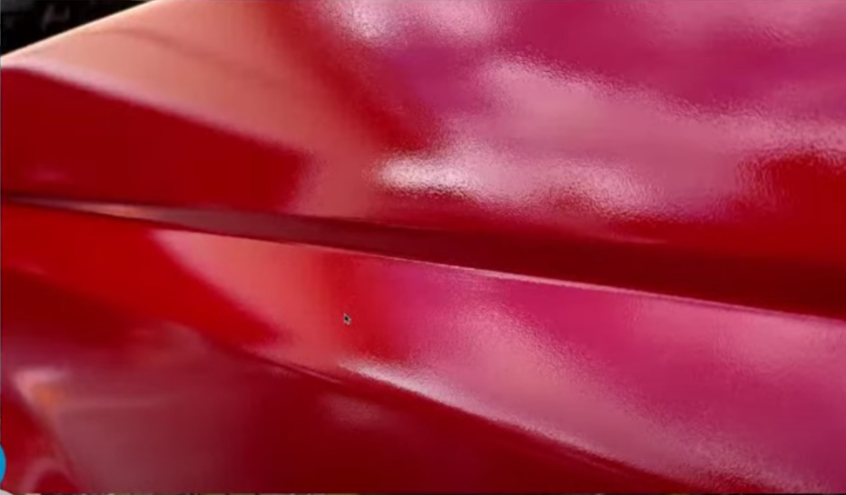
So this orange peel, if you’re doing panels use a slow reducer, slow activator, and slow hardener. Because it’s going to give your paint a better chance to flow out. Now it looks like to me that you’re just not laying it on glossy/paint on enough. You’re spraying it but it’s you’re not laying enough paint on it which is giving you this type of orange peel-dry finish. It looks pretty bad, instead of buffing it out, I would re-clear it.
I would sand it down with like 800 grit, you don’t have to go down or cut the orange peel out but just at least knock off the high edges. Basically the high areas of the orange peel, you don’t have to go all the way down till it’s flat because you might cut through to the red base coat.
But just knock it down, lay two coats of heavy clear coat on it, and then you can cut and buff that, that’s what I would do. If you feel like you want to start over, you can just cut it down even more. You might risk going through the base coat then just give it a new coat of base and clear coat it again. Make sure you lay it on really heavy. I think that’s the number one problem people have when they’re spraying is they’re not putting enough paint on it. It’s because of the fear of running or whatever. I would rather have a run than have dry patches or a dry paint job. There’s nothing worse than a dry paint job with a run. You can sand it out and fix it.
This orange peel, you’re not laying enough paint on it or a combination of too low air pressure. You’re not atomizing your paint, good as much as you should be. The low air pressure will make your paint kind of like blotch on instead of lay on. But even if you have a low psi, if you’re laying it on, it’s gonna get glossier than that, so low pressure has a little bit to do with it.
Make sure you’re spraying your clear coat at 27-28 trigger pulled, 27-29 PSI trigger pulled, read the gauge, it says 27,28-29 that’s what you should be spraying clear coat at, and don’t be afraid to lay it on.

The other thing could be the spray gun. If you have a crappy spray gun it might not atomize your paint as well and you get that. This is why I recommend at least a medium-grade spray gun and you’re going to get good results. Cheap spray guns, the triggers are messed up and you don’t get the best optimization, and sometimes when you clean them all the color comes off.

-=Watch the full video for more autobody guides and tips=-
🔗For more helpful links🔗
Paint Peeling Repair | Paint Gun Settings | Best Sandpaper Grit and More Autobody Q&A
Primer, Base/Clear Spray Gun, Sand to Bare Metal or Not? Causes of Orange Peel? | More Autobody Q&A
How To EASILY Fix Chemical Reactions On Your Car Paint Job | Autobody Q&A
$25 Spray Gun VS Mid Grade $150 Spray Gun – Spraying 2k Filler Primer + Golden Paint Tips!
Collision Repair Basics: Front Bumper Support Install and Alignment