Discover How to Apply Auto Primer: Part of the Bodywork Repair Process
Steps include:
Mixing Auto Primer
Filling your Automotive Spray Gun
Applying Auto Primer
Applying Automotive Paint Guide Coat
Sanding Auto Primer
Removing Paint Masking Paper, Surface Cleaning ready for Paint Application
Primer products are used generally on parts of body work that have sustained repair work or have very minor or shallow sheet metal scratches.
Never use primer as a substitute for body filler. Any layers that are applied too thick will shrink making the sanding scratches and other imperfections even more noticeable.
How to Apply Auto Primer:
- Mixing Auto Primer
Carefully mix the primer to ensure a proper application is achievable. Using a calibrated mixing cup makes mixing primer with the correct reducer simple. Always be sure to read the mixing instructions to verify the correct ratio.
- Filling your Automotive Spray Gun
After thoroughly mixing by stirring, place a paint strainer in your automotive spray gun cup and pour in the primer.
Never pour any kind of paint product into an automotive spray gun cup without a strainer. Strainers are usually free from where you purchase your paint. By not using one you run the risk of ruining your automotive spray gun if a speck of dirt or debris gets lodged in a passageway that you can’t clean.
- Applying Auto Primer
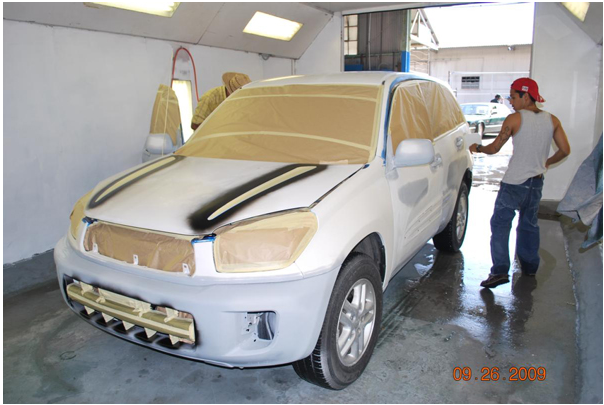
Please note: With primer being sanded, there is no need to spray it in a spray booth. A clean, dust free area should be sufficient. There will be some overspray however, so the immediate area surrounding the repair area needs to be masked off, be sure to tape any seams in the masking paper.
After you have successfully sanded smooth a top coat of glazing putty using 400-grit wet and dry sandpaper, the area properly masked off, primer mixed and loaded into your automotive spray gun and a respirator on, you can begin applying the primer.
Make sure that you always hold your paint spray gun perpendicular to the surface area being sprayed at all times, with the air line held back away from the vehicle.
When spraying the lower edges of the vehicle, it is essential to bend over or kneel down so you can see what you are actually spraying; ensuring an adequate coverage is achieved.
Spray two to three coats of primer onto the repair area, leaving sufficient time in between coats for the primer to dry.
Don’t spray primer all the way up to the paint masking paper, as that would create a harsh line at that point. Instead, taper the primer from a heavier application on the actual repair area to a very thin dusting before reaching the masking line.
The use of Seam Sealer:
Many panels such as doors are made up of an outer skin lapped over an inner panel or framework.
Where these panels overlap, apply seam sealer to prevent moisture from seeping between the two panels and causing a rust problem. Apply seam sealer after all bodywork and sanding has been completed but prior to applying sealer.
- Applying Automotive Paint Guide Coat
Once the final coat of primer has been applied and dried, to aid you in detecting the progress of primer sanding, spray a light layer of matte black automotive paint guide coat over the surface. Most novice auto painters should probably apply the automotive paint guide coat a little heavier.
Sanding will immediately remove this coating from high spots and highlight low spots. You don’t have to find any special type of automotive paint guide coat; flat-black paint or any contrasting color will work.
- Sanding Auto Primer
Now use 400-600 grit wet and dry flatting (sanding) paper to smooth the surface with. I personally prefer to use 400 grit. I hear a lot of guys whining like babies saying that 400 os too coarse which is a bunch of bull in my opinion. I had a conversation with Jon Kosmoski, founder of House of Kolor and he completely agreed with me and said that he also uses 400 grit as a final grit to paint over.
If you find that two to three coats of primer did not produce the results you were expecting and very fine sanding scratches or a shallow low spot remains, apply a couple more light coats of primer and again, sand with 800-grit wet and dry flatting paper.
- Removing Paint Masking Paper, Surface Cleaning ready for Paint Application
Due to the high solid content of primer, flakes of primer can easily flake off paint masking paper and land onto work surfaces. It is best practice therefore to remove masking sheets used during primer applications.
Sanding dust will get everywhere, this will require a complete cleaning with air pressure, wax and grease remover, auto glass cleaner and tack cloth before any color coats can be applied.
You can now begin masking for sealer and paint applications.
I hope you liked this blog. Talk soon!
-Tony
P.S. If you want to learn more, about auto body and get all the information you need so you can customize your projects, learn how to restore your classic or put a body kit on your car, check out VIP here: LearnAutoBodyAndPaint VIP Course.
Other Helpful Links:
Applying Automotive Primer, Automotive Epoxy Primer and Primer Sealer
Update on Mazda Miata project – How To Auto Body and Paint Your Car
How To Paint a Car With Single Stage Enamel Paint
How To Wet Sand & Prep Car for Paint!
How To Paint a Car Yourself – A-Z Car Painting Steps in 12 Minutes
just a question on a small project I’m attempting to do, I purchased a wood heater for my camp an it needs to be reworked and painted before I set it in place, I have the rework done, now want to paint it. my problem is it has louvers in the top to let the heat out and they are pretty rough from being left out side in the weather and it has had some hot suppers if you know what I mean, what’s the best way to paint the top part and smooth it up. Do I need a primer or high heat paint , just shoot me an answer if you can I know it’s pretty hard with out seeing it but thanks ahead of time Alton
Hey Alton, yeah it’s pretty hard to reply to give my inputs here. Why don’t you join me in my live streams. You can also check out VIP to help you with your project: https://www.learnautobodyandpaint.com/vip-offer/