Hey! What’s goin’ on?!
Thank you for dropping by today. A couple of weeks ago, I did a blog contest. I asked everyone to send in their most burning Auto Body and Paint questions. We got 67 questions from Facebook alone and 45 on the blog.
Thank you to everyone for participating! We gave away a Free VIP course membership to one lucky winner.
If this is your first time watching my videos and checking out our site, make sure you click on the graphic to the right. I want to give you a FREE 85-Page Auto Body And Paint Manual. Hopefully, it will help clear the clutter with some of your DIY painting confusion. So just click the image of a book you see on the right or you can click the Free Book tab above. When you do that, it will send you to a page where you just have to click on YES! SEND ME MY FREE MANUAL. Enter your best email and I’ll send you a link to download it. That simple.
You’ll also find the same if you go to the homepage. It may look different every now and then because we’re always changing and updating stuff on the site but it’s the same thing you do, just click on it and enter your good email.
So today, I’ll answer a few questions on auto body and paint repair. You have a lot of questions that I want to cover but we’ll do two for today’s episode.
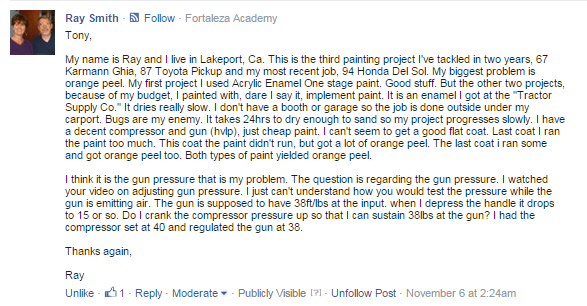
Let’s check out Ray’s question…

Yes. So what you need to do is, you should have about 80-90lbs. coming out in your line to your gun. This way you have a lot of volume there. If your tank kicks down below it, it will maintain it. If you have it set at 150PSI and it drops down to 120 or 100, it cranks back up again to fill up. Then you’ll know that you have a steady 80lbs. or so pressure to your gun.
You should also adjust your spray gun – depress your trigger, have the air come out and cut your air at the gun so it’s at about 28-29PSI. I know they’re telling you to paint at 38PSI. In my opinion, I think it’s too high and you’re going to waste a lot of materials at that.
It doesn’t matter what kind of automotive paints or enamel you’re using. Typically, 24-29lbs. (for base coat/clear coat) is the ideal spraying pressure. You don’t want to spray more than that, alright? Don’t listen to the technical details on the cans of the paints. If they give you a ballpark but it’s way too much for the High Volume Low Pressure (HVLP) spray guns, 28-29PSI, in my opinion, is plenty of volume. It’s plenty of atomization – more than enough to lay out flat base coat, clear coat, synthetic/acrylic enamel paint jobs.
So cut it back down to about 28lbs. If your paint seems a little thick, reduce it…because thick paints will cause orange peel. You’re not going to have that flow out.
Also, when you’re painting, you want to make sure that you’re using the light as you paint. Observe how you’re getting that glossy look as you paint. You’d want to see what you’re painting. So as you lay your paint on, watch it lay on glossy. If it looks dry, then you’re not doing it right. I wouldn’t go back with the same amount and just fill it in.
I mean, that’s the reason why I urge a lot of people to check out the VIP Course because I talk about a lot of these in detail on video so you get to see exactly what I’m doing, what I mean, how I use the light and how you could do the same things. That way, you guys don’t end up with these orange peel mistakes which end up costing you more time and money because now you have to go sand it down, buy more paint and redo the job.
But that’s the gist of it, you know. I think if you just do that, you will get a lot better results.
Another thing that would help is, why don’t you just use basic acrylic enamel like a basic automotive paint?
You’re not going to spend a lot more, maybe double the amount in paint. So if you’re spending $30-$40 a gallon for your cheap enamel, why don’t you spend just a little bit more? You know, for less than a hundred bucks you can get a good, high-quality automotive enamel gallon kit. Do that instead and you get a cure time in a few hours (probably 4 hours on a good warm day). You can get a nice touch-to-feel paint job – you can touch it but not push your finger and it will be dry in about half a day.
Next, this one’s from David…

Okay David, you don’t want to double your reducer, you shouldn’t thin your paint down too much because you’re going to end up with coverage issues. You’ll be spraying and spraying and still have spots left uncovered. You’re just going to get runs. So you do not want to do that.
Anyway, I would keep your mixing ratios exactly the same. When you asked me what mixtures to use – it’s very vague because I don’t know what brands of paint you’re using.
Usually, you could look at the back of the can and use those mixing ratios, go by whatever’s recommended.
But you should spray at 24 to 28, 29 PSI. With enamels, you can cut it down a little bit to 25, 26, 27 PSI. For base coat/clear coat, I like it a little higher at 28-29PSI. I never go to 30PSI.
Now for your compressor issue…that’s a very small compressor. If you’re doing small projects, that would be fine with a High Volume Low Pressure (HVLP) spray gun. But your 17 gallon is extremely small. Probably, you’ll do good for a little motorcycle paint job with it but the compressor will still be running. A Low Volume Low Pressure (LVLP) spray gun would be best.
I really recommend checking out the Zoola if you want to browse through awesome spray guns. Take a look at the Atom X27 Spray Guns. If you’re looking for an amazing, super high-quality gun, it is one of the most popular guns that we sell.
Check it out! I think you’ll really really like this spray gun. It’s only at $169.95.
If you want to get the LVLP version, just email us after you make the order or indicate it in the Notes field on the order page. We always have customer support on.
I hope I answered your questions, my friends. Now you know better about these stuff like Spray Gun PSI Settings.
Please let me know if you like this video, if you want me to keep doing them like this or if you prefer me reading and answering the questions on camera. Leave your comments below.
Again, a lot of these questions that you guys posted here – we have so much more information inside the VIP Course that basically covers all the questions that you’re asking me. So far, I’ve never really came across a question yet that isn’t covered inside the LABAP VIP Course.
So if you’re interested in auto body work and painting, it doesn’t matter if you’re a teen or a senior citizen who wants to learn how to customize your cars, projects, pump out amazing pro-gloss looks. Get our FREE Manual and we also give out a FREE 90-Minute Auto Body And Paint DVD. Just help me with shipping.
Better yet, Join our VIP community. We currently have over 5,000 members from all over the world. We have an interactive online community, a private forum, private Facebook group and I guarantee, you’re really going to like it!
I’ll talk to you soon!
Cheers.
-Tony
Other Helpful Links:
Get A Free 90 Minute Auto Body DVD Here
How To Auto Body And Paint Q&A – Part 1
DIY Auto Body Work And Painting Q&A – Part 2
How To Paint Cars – Q&A Part 3
Can You Add Pearl In Base Coat?
Spray Gun Air Pressure Required For A Successful Paint Job
How To Set Your Spray Gun Air Pressure
How To Paint A Motorcycle Yourself
Preview Finished BMW Body Kit Video
Warwick Spray Gun Review (what we use to paint at LABAP)

Hi Tony. Do you send your VIP course out in the mail on DVD’s and books or on the internet? Thanks, George
hey George, we have both the physical course (DVD’s and books) and the online course. See both here: https://www.learnautobodyandpaint.com/shop/